
Installing an air conditioner isn’t just about fixing a machine to a wall and hoping for cool air. For business owners, it’s a strategic decision that affects comfort, energy bills, and even employee productivity. At HVAC Engineer, we often meet clients who underestimate how much planning goes into a smooth setup. Let’s walk through a realistic, step-by-step guide that shows what proper installation actually involves.
Whether you’re setting up a system for a shop, office, or home, professional Air Conditioning Installation is the difference between “it works” and “it works efficiently for years.” Think of it like laying a foundation for a building—do it right once, and you avoid headaches later.
Step 1: Assess the Space Before Buying
One common mistake business owners make is choosing an AC based purely on price or brand reputation. The smarter approach starts with understanding your space. Factors like room size, ceiling height, insulation, and sunlight exposure all influence the cooling load.
- Large glass windows may increase heat gain.
- Server rooms or kitchens generate internal heat.
- Open layouts need different airflow planning than closed cabins.
According to the U.S. Department of Energy, improper sizing can lead to frequent cycling and higher power consumption.
Step 2: Select the Right AC System
Once the space is evaluated, it’s time to match the system to the requirement. Split ACs work well for smaller offices and shops. Ducted or VRF systems suit larger commercial spaces where uniform cooling is critical.
Here’s a practical tip from the field: if your business expands often, consider scalable systems. It saves you from replacing the entire setup when you add a new cabin or floor.
Step 3: Plan the Installation Layout
This is where technical thinking meets real-world logistics. The indoor unit must be placed for balanced airflow, while the outdoor unit needs proper ventilation and safe access for servicing.
Key layout considerations:
- Indoor unit should not blow directly onto workstations.
- Outdoor unit must have clearance for heat discharge.
- Drain pipe should allow smooth water flow without bends.
Skipping this planning stage often results in uneven cooling and water leakage issues later.
Step 4: Electrical and Structural Preparation
Before the AC is mounted, the electrical load must be checked. A dedicated power line with proper earthing is essential, especially in commercial environments where multiple machines run simultaneously.
Wall strength also matters. Mounting a heavy indoor unit on a weak partition is like hanging a safe on a cardboard wall—sooner or later, it fails.
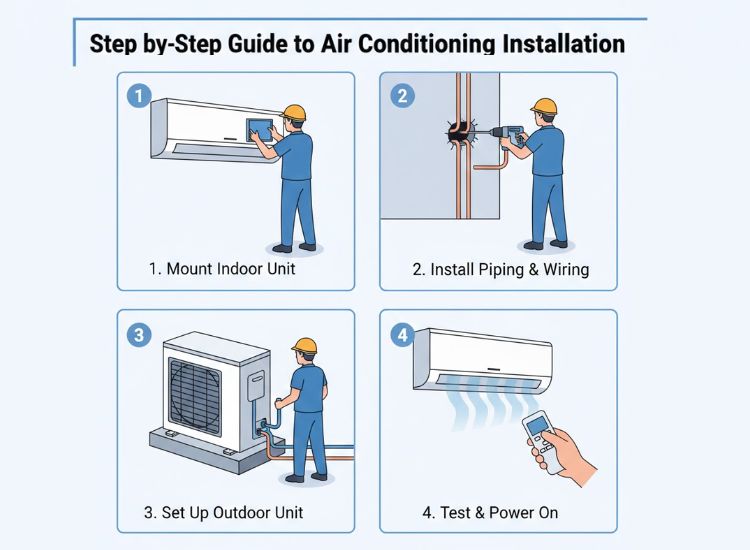
Step 5: Actual Installation and System Setup
Now comes the visible part—mounting units, connecting copper pipes, vacuuming the system, and charging refrigerant. This step is highly technical and must follow manufacturer specifications.
Midway through many projects, we get calls related to AC Repair In Bengaluru caused by rushed installations. In most cases, the root issue is poor pipe insulation or incorrect gas pressure. Proper vacuuming alone can significantly increase compressor life.
Step 6: Testing and Performance Check
After installation, testing is not optional. Temperature output, airflow, noise levels, and power draw should all be verified. This step ensures the system isn’t just running—but running correctly.
- Check cooling speed within the first 10 minutes.
- Observe water drainage flow.
- Monitor unusual vibrations or sounds.
Business owners benefit from this stage because it reveals early issues before daily operations depend on the AC.
Step 7: Handover and User Training
A good installation ends with proper handover. Remote settings, temperature recommendations, and basic maintenance tips should be explained clearly. For offices, this avoids staff playing with controls and overloading the system.
Why Proper Installation Saves Money Long-Term
When done right, AC installation reduces energy waste, lowers repair frequency, and extends equipment life.
For B2B and B2C owners alike, this isn’t just comfort—it’s operational efficiency.
Frequently Asked Questions
Is professional AC installation really necessary?
Yes. Professional installation ensures correct sizing, safe wiring, and optimal performance, which directly affects running costs and equipment lifespan.
How long does AC installation take?
Most split AC installations take 3–4 hours. Larger commercial systems may take one to three days depending on layout and ducting.
What is the ideal temperature setting for offices?
Experts generally recommend 24–25°C for offices to balance comfort and energy efficiency.
How soon should the first service be done after installation?
The first maintenance check is best done after 2–3 months to ensure filters, gas levels, and drainage remain optimal.
Final Thoughts
Air conditioning installation is not just a technical task—it’s a business decision. When planned and executed carefully, it improves comfort, productivity, and long-term savings. For business owners, the smartest move is treating installation as an investment rather than an expense.